TABLE-TOP: Building Part 3
The weather may have improved but my return to work has become more inconvenient when it comes to advancing my projects. A rapid deployment 'up north' took me out of action but I am back at it again. I might say that any terrain project of this size is going to have it's monotonous elements and it is hard at times to soldier on but the ends justify the commitment - at least they had better.
As is often the case, a break away from the coal-face often yields results as it gives me time to think. With foam layered construction of this depth, protecting the sides of each tile is an issue. Normally I would plaster it with soaked newspaper pieces and apply them with a diluted PVA (white or wood glue) solution as I have done for those areas of marsh. This has been a tried and true method for me when applying a paint/sand mixture for colour/texture.
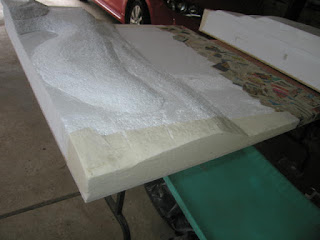
This time I am experimenting with material - calico to be precise. I chose calico as I had plenty of scraps lying around and it's cheap. I simply soak (briefly) in cold water and apply to liberally white glued sections - smoothing with my hands and the brush. Plenty of glue is painted over the top. This is a wet, messy process and the secret is not to spare the glue. It has proven far less time consuming than my paper alternative. To avoid creasing or wrinkling along the top fold, I have to cut several vertical vents all along the top where there are variations in depth. This allows for smooth and even folding across the top edge along the varying contours.
I ensure that the calico is wrapped across the top and underneath the terrain boards, providing a complete protective seal. When the teddy-bear fur is finally glued to the top, the foam will be completely encased. When completed, I will be able to paint the sides, making for a more natural appearance - perhaps in strata if I can be bothered. When wet, the calico is really easy to manipulate and all pockets and wrinkles are easily smoothed out by hand.
I am very pleased to say the experiment worked extremely well, providing a plaster bandaged type seal all around the edges. Any irregularities in the fit between terrain boards will be camouflaged by the thick carpet of fur across the top of the boards - the joins should appear seamless. Finally, it came time to apply the synthetic fur - "The ram has hit the wall!"
I spend some time and experimentation with adhesives when it came to sticking the fur to the foam. I ended up using Elmer's Extra-Strong Spray Adhesive which is readily available and in international distribution. I chose this because it only needs to be applied to one surface, the surfaces only need to be pressed together after no more than about 15 seconds and it takes an hour to set. It requires no clamping (bit difficult for fur on foam) and is really tacky so grips very well. Also, and perhaps a primary consideration was that it is non-corrosive and thus preserves the foam.
I thought I might have to cut various shapes of the fur to cover the contours but there is plenty of elasticity in the synthetic fur material and it just draped across all the lumps and bumps, rises and falls of my landscape. I was delighted. I draped the fur across each terrain tile and cut individually - smoothing the fur across the surfaces and into each contour with my hands. The fur gripped immediately to the foam. I then lifted, or rather peeled back half of the fur from each tile and liberally sprayed the surface underneath. I did not spare the spray on this job and did give the underneath of the fur (the material side) a light spray to assist. Being mindful to count as I went, I smoothed the fur back over the sticky foam and an hour or so later, repeated the process on the other halves.
Once the edges are trimmed, it will be time for clipping the fur, forming the trackways, crops and flats.


Comments