Posts

Showing posts from 2012

Richard de Grey's Company: Centre Ward Foot

Image
  Richard de Grey, knight of Codnor was the son of Henry de Grey and Isolda Bardolf. The Grey family’s principle estate held by the senior members of the de Grey family was Codnor in Derbyshire. Before continuing, as with many persons in the historical record there exists on the Internet a deal of confusion concerning lineages and there exists contradictory material on Richard. It remains unclear to be when my Richard was born and his age at Lewes, there being a good deal of suggestion that he was quite elderly at the time but I suspect on-line details of his life confuse this Richard with his immediate predecessor. I have relied on the tried and true websites such as The Peerage and the published works on the Barons War and Battle of Lewes. The details given, whilst not complete, are at least those I remain confident of. What's left of Codnor Castle today Richard certainly lived and was most probably born at Codnor castle. He had inherited estates of the lands formerly

TABLE-TOP Building: Part 5 (TIPS)

Image
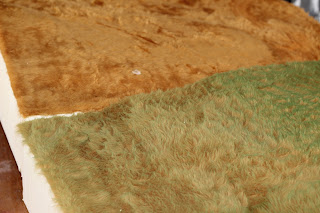
Well, in spite of my best efforts, work, family and fate seem to conspire against my making too much progress along hobby lines. Having said that, I haven't been completely idle and have learnt how to use my airbrush and compressor - not without difficulties. The above shot was taken on my new Canon EOS 600D (digital SLR) which I am also learning to use. Hopefully the three states of my synthetic fur painting are evident. At the rear is what the camel coloured fur looks like before painting. The section in the left side foreground is the fur after having been given one coat of spray over a week ago. The right side mid section is the greener area having been given a second coat. The difference in colours are perhaps better seen in the second photo. I have picked up a number of tips as I've progressed which I thought may be of interest. First is more of a caution - spray painting this size project is extremely time consuming with an airbrush. It takes me more than an hour

TABLE-TOP: Building Part 4

Image
I don't know what came over me this past weekend but I found my terrain building Mojo and just got stuck in. Having glued the synthetic fur to the polystyrene, I needed to trim the material back flush with the edges. As you can see, I brushed the fur into the centre of the boards before trimming to ensure the fur length right up to the edges - I deemed this especially important for internal edges. Once that was done, there was no reason to put off giving the terrain it's hair-cut. I trimmed those areas of intense habitation or use right down to the base - that being the rise where the furthest extent of Lewes township appears and the site of the windmill. I began by using a Breville brand electric hair clippers but after some time realised that the hair care scissors which came with the kit was far quicker and more effective at getting straight to the base. I finished off with the clippers though. Pathways and habitation areas marked by brushing before trimming The

TABLE-TOP: Building Part 3

Image
The weather may have improved but my return to work has become more inconvenient when it comes to advancing my projects. A rapid deployment 'up north' took me out of action but I am back at it again. I might say that any terrain project of this size is going to have it's monotonous elements and it is hard at times to soldier on but the ends justify the commitment - at least they had better. As is often the case, a break away from the coal-face often yields results as it gives me time to think. With foam layered construction of this depth, protecting the sides of each tile is an issue. Normally I would plaster it with soaked newspaper pieces and apply them with a diluted PVA (white or wood glue) solution as I have done for those areas of marsh. This has been a tried and true method for me when applying a paint/sand mixture for colour/texture. This time I am experimenting with material - calico to be precise. I chose calico as I had plenty of scraps lying around and it&

TABLE-TOP: Building Part 2

Image
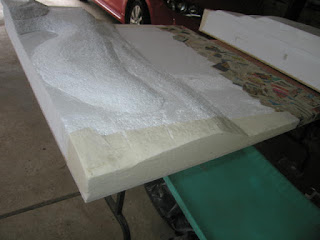
Having fine but cold weather these past few days has enabled me to complete my Downs of Lewes to the sanding stage. I have completed all eight levels of the Styrofoam construction, being mindful to return and justify the sides repeatedly. They need to be a near to perfectly square as I can make them, requiring re-shaving and sanding back each time a new layer is added . As you can see, it looks quite the colossus in pure white and for the time being my car has taken up residence on the drive. The dots in the mid-left quadrant are figures from my Lewes collection to give some idea of scale. There was a time early in this build that I pondered whether to add another 300mm to the left of this shot (another half tile width) but then decided against it. The table is big enough and players need to be able to reach into the middle from at least one side. I moved straight on to the chamfering stage and started out with a hot-wire cutter - this time a hand held 'Polylon' cutter w

TABLE-TOP: Building Part 1

Image
The Royal army edge of the battle field complete to basic construction Well now I'm home once more, I have commenced building the terrain for my version of a 28mm Lewes 'Downs'. This has required about AUD250.00 thus far with a ways to go before completion. I bought several sheets of quite solid (and rigid) 9mm interior ply which was cut into 900x900mm squares (near enough to 3'x3' in stone age measurements) and 14 sheets of 600x1200mm polystyrene (white foam) 25mm thick. I went with the 9mm ply to ensure against warping and help anchor the built up terrain pieces - they do make for heavy(ish) pieces. In approaching the build I have layered the foam, cut to the contours as laid out in my map (see previous TABLE-TOP post) and after basic construction I will sculpt the slopes back from the edges of each sheet. In approaching this particular build the first thing I needed to do was determine what thicknesses of foam to deal with. Whilst the contours represent 50&

TABLE-TOP: Battlefield Planning

Image
I have been absent for some time now from both home and this blog, but not entirely idle - I have been thinking and purchasing. It had long been my intention to commence building my terrain for this project once I had reached the half way mark on building the Rebel army, which I have now done. This was essentially to ensure a complete match between my table-top battlefield and my figures' bases. Whilst not able to commence construction for a further two months, I nevertheless require consideration of what my table top should look like. DEBATE Yes, you guessed it - opinion remains divided on the issue of where the respective armies both formed for battle and thus where the battle took place specifically on the Lewes Downs. As used to be the case with Bosworth field, until such time as a full archaeological survey is undertaken we have two preferred sites remaining to chose from in Lewes. Without getting drawn into this ongoing and academically speculative debate, it must suffi