TABLE-TOP Building: Part 5 (TIPS)
Well, in spite of my best efforts, work, family and fate seem to conspire against my making too much progress along hobby lines. Having said that, I haven't been completely idle and have learnt how to use my airbrush and compressor - not without difficulties.
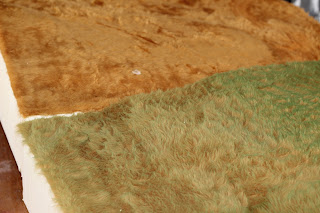
The above shot was taken on my new Canon EOS 600D (digital SLR) which I am also learning to use. Hopefully the three states of my synthetic fur painting are evident. At the rear is what the camel coloured fur looks like before painting. The section in the left side foreground is the fur after having been given one coat of spray over a week ago. The right side mid section is the greener area having been given a second coat.
The difference in colours are perhaps better seen in the second photo. I have picked up a number of tips as I've progressed which I thought may be of interest. First is more of a caution - spray painting this size project is extremely time consuming with an airbrush. It takes me more than an hour per coat. When applying the paint to the fur, I ruffle or brush the fur so it stands as upright as possible so that the spray gets down the length of the hair, ensuring better or deeper penetration. What I am attempting to do is give my fur as thorough a base colour as possible - I want very green grass for Lewes in spring time. When I spray, I work the whole section from one angle, spin the board 180 degrees and then hit it from the other direction - that's one coat. I tend to switch from spraying in a side to side motion to a circular motion and get the brush down to within 15 centimeters. Figuratively I am massaging the paint down to the roots.
This requires patients as I don't want the paint to bead or the fur to thicken any more than I can avoid. This colouring will require a gradual build up of colour and I anticipate the mid to dark green base colour will require three separate coats before I start hitting it with lighter shades. I need to give each coat plenty of drying time - 24 hours at least and that's in a warm, dry Canberra Spring/Summer.
Whilst this is taking some time and I've never worked with these tools on this type of terrain before, I can see it's working and I am happy with the results. I've talked a long time about synthetic fur terrain and now that it's under way, I doubt I'll ever go back. It remains to be seen how much more progress I can make before I am posted overseas. I'll give it as good a nudge as I am able before having to shelf this side of my Lewes Project.


Comments
Jason.
http://merseybooks.blogspot.co.uk/2012/11/shiny-happy-people.html
Keep up the good work :-)
Dan